If you are lucky enough to have your own grass fed cow on your organic property, or are able to access raw cream from an organically raised cow that isn't fed grain, you can make the most nutritious butter that is actually good for you. Yes, butter is NOT bad.
For more info on health benefits of butter read Nourishing Traditions- Weston A Price Foundation
Use cream that is a few days old to make butter. It will "turn" or "clabber" faster.
Take it out of the fridge in the morning so that it is at room temperature if you are making it in the afternoon. Or if you want to make it in the morning it would be best to remove it from the fridge the night before.
Never fill your mixer bowl to more than half full, to allow the cream to move around, and prevent splashing all over the bench tops and everything around you.
Set the mixer to the Whip Cream setting and watch while the cream turns from runny, to whipped, to butter and then splits.
Use a pliable spatula to move the outside cream into the centre for even mixing.
Notice the colour changing to a more butter yellow. During our South Australian summer when the cows are being fed dry feed, the butter is much lighter in colour. As soon as the paddocks green up, the butter becomes yellower.
This is the stage at which the cream has turned to butter. Slow your mixer just before it gets to this point to avoid lots of buttermilk splashing out of the bowl.
Squeeze a small amount with your fingers to feel the buttery texture, taste it, it's butter.
Scrape the butter from the beaters with a knife.
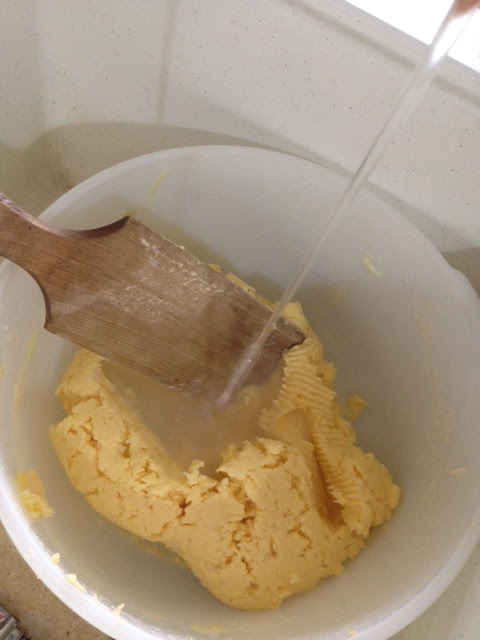
Wet your butter pats with cold water to ensure the butter doesn't stick to them.
Using a wet butter pat, move the butter to one side while squeezing out the buttermilk.
Carefully tip the buttermilk into another container and put aside.
I salt my butter because we love the taste and it also helps to keep longer. I use either Himalayan Pink Salt or a good sea salt. This batch of butter was approximately five cups of cream to which I would add two teaspoons of salt after washing. This is to our taste though, so you should salt it to your taste.
This bit takes a bit of practice, so you could do as I did in the beginning. I used one butter pat, because I owned only one at the time. Pick up a small portion to the size you want, squeeze lightly between your hand and the pat to remove as much liquid as possible. Squeeze and shake over the sink or bowl. Then place it onto the dampened bench or board.
Using your hand and one pat, or once you get the hang of it, two pats, shape it into a square or rectangle shape. You will notice that more liquid oozes out. Wipe the board with a wet cloth after each piece is shaped.
I use a cheaper brand of greaseproof paper to wrap the portions. It doesn't need to be the cooking parchment paper which is far more expensive.
Writing the date on each portion helps me to keep track of which butter to use first. Sometimes I weigh into specific size portions and write the weight next to the date.
Place into a zip lock bag, removing as much air as possible before placing into the freezer.
If you are going to use vacuum sealer bags you will need to freeze the butter portions first. I can tell you from experience that vacuum sealing fresh butter doesn't work very well unless you want flat butter!
I take a portion from the freezer when we are almost out of butter in the fridge. This "real" butter with no additives or colorings, from a cow that eats as nature intended, fresh grass and hay (dried grass), has a lower melting point than the shop purchased butter. ie it spreads almost straight from the fridge. Because it doesn't contain any preservatives, apart from the salt, it will not keep as long as commercially produced butter so make your portions a size that you will eat within approximately one week.
It is just like any foods that we make from scratch without using preservatives. That's why we make food from scratch isn't it?
And now the butter milk. Date it and keep in a jar in the fridge to add to so many dishes and baked goods.
This is not the buttermilk that we see in the shops. That is cultured buttermilk. This is the real butter milk left over from making butter. We can make it cultured by leaving out on the bench at room temperature for approx 12 hours until it starts to ferment and gets bubbly. Then put it back into the fridge. At this point it is even better for using in bread making (substitute it for some of the liquid), cakes etc. It aids the rising agent or yeast, depending on what you are making.


I've been wondering how to culture my homemade buttermilk! Thank for that tidbit. I think it will be good for my cheesemaking.
ReplyDeleteLeigh, I hope you will share your cheese making method using the buttermilk. :)
DeleteThat was a brilliant post, really informative. Butter is something I've never had a go at, but then again I've never had a cow :-)
ReplyDeleteI wish I had a cow! We live on a 550sqm block by the beach and sometimes I really feel that we should be living somewhere else....torn! I do love this post, thanks.
ReplyDeleteClarissa, sometimes I wish I was living on 550sqm block by the beach. ;) Thanks for leaving a comment.
Delete