Monday, 30 November 2015

Keep Calm and Make Cheese


Brian always turned the handle while I tipped in the milk to separate the cream from the milk in our antique cream separator. Now that I'm working only two days each week since I turned sixty in October, I'm trying to take on more of the jobs around here. So I taught myself to assemble all thirty of the pieces and now I can do the whole job myself. 
It's an empowering feeling to learn more things isn't it?
A good workout turning that handle, then to turn the little tap just right so I can block the milk running through and quickly change buckets and tip in more milk. The first couple of times would have been pretty funny to watch, but now I feel more confident and the extra effort is well worth it.
The skim milk is the by-product which gets tipped into the two yogurt buckets sitting in the sun that is fed to the pigs and chooks after it turns into yogurt.
The cream... sigh... is swooningly good to eat and after a day in the fridge it is so thick the spoon stands up in the container. 

 It's the cleaning of all the pieces in hot soapy water that takes more time than the actual separating. Then all of the pieces must be placed to dry in the sun, or on the side of the stove, before packing it away ready for next time.  
We inherited our separator from my older brother who found it when packing up his property for sale twelve years ago. We had just bought this property of ours and although cow ownership was the furthest thing in our minds back then, I'm so happy that we accepted this gift graciously.
Recently, the poor old thing has been making some disturbing noises, so I made inquiries about purchasing an electric separator and soon realised just how difficult they are to find in Australia. 
Then Brian, Mr Handyman Extraordinaire, pulled apart the machine part of it, gave it a "service and oil" and joy of joys, it goes brilliantly once more. Ready for another fifty years of service.


My neighbor Meg shares my passion for cheese making and recently, in return for some raw milk she gave me one of her cheese cultures that she bought on-line. 
So I made some blue vein cheese using the Penicillium Roqueforti culture.
My curiosity got the better of me and I cut this one open at three weeks old which is a bit early, but the flavors are deliciously mild. I will ripen the other cheese that I made on the same day for another two weeks before opening and hope that the flavors are stronger and more typically blue vein.
This is the recipe I followed  to make Blue Vein Cheese, but I have not found it necessary to buy the cheese kit because I have accumulated all of my bits of cheese making equipment over the past few years.  I find the Mad Millie recipes are really simple and easy to follow compared to lots of others and I always use the Mad Millie Rennet tablets.

Tomorrow I'll make a batch of cream cheese that I will use to whip up a cheesecake for dinner with friends later this week.

So, keep calm and carry on, or make cheese.

Thanks for your visit to my simple little blog about our days here on our farm.
Your comments are always read with much joy and I will try to answer them all.


Thursday, 26 November 2015

A terrifying day

It is 3.30pm, blowing a fierce gale and the day becomes dark, the power goes off and the only radio is in the car and it's telling us that the fire is heading our way buffeted by 60km winds.
Brian had filled the fire unit on the back of the ute and headed off in the direction of the fire. This is what farmers do, they rush off to help contain the fire front as a back up to the CFS. (Country Fire Service)
I high tailed it home from work and felt less panicked once I got here and brought the cows down from the hill, confining them in a paddock close to the house yard, hosed down the pigs and watered the garden.
We have a fire plan and have needed to action it in preparation three times in the past three years. Usually I'm here alone as Brian heads out to be closer to the fire to be useful. I'm proud of him doing that and wouldn't want to hold him back, but it also leaves me feeling vulnerable.  So I keep very busy going through the routine in readiness. We stay in touch with our phones and he listens carefully to ABC radio for all the news of where the fire is heading. He also gets the first line information as he's there in the thick of things.
I packed the car with a change of clothes for each of us and my laptop. This time I packed only one pair of shoes each. It is interesting to learn just what we throw into the car when an emergency strikes, often realising how crazy some of our decisions were when we unpack after the threat has passed. Last year I packed four pairs of shoes, my filing cupboard contents, laptop and other random stuff.  We in our community laughed afterwards about the stuff we all packed.
Yesterday afternoon was another one of those most horrific experiences that put the fear of life and terror into us all. The sky was black and the wind was roaring. Small pieces of black ash embers blew all around and were landing in the dry grass, on the verandah, everywhere.
Contact through Facebook to friends in various directions keeping each other informed and promising to phone each other if they see the fire front approaching. I can't put into words how comforting this contact is and was grateful when a distant neighbor offered to bring a fire unit over to help me out if the need arose.
Huge relief to hear Brian's ute coming down the road with a unit full of water and hear that he had decided it was time to stay and protect us instead of going back out again.
Yesterday we survived, but many homes, farms and stock didn't. And two people, perhaps three, lost their lives.
Today is a day of appreciation for all that we have here. To walk around doing my chores with a renewed sense of gratitude.


  A few days ago I added a link to Rhonda's "Down to Earth" blog. Then yesterday I was treated with a mention on her wonderful blog.  Read what Rhonda blogged about here.
I feel overwhelmed and very excited that some of her readers have come to visit my blog and left comments. It feels like I have met a new bunch of friends who think along similar lines to myself.
One comment from Liz who offered advice about my earwig problem in the vegetable gardens;

Have you tried letting your chickens go in there? Maybe if you had a pile of damp mulch off to the side it would tempt the earwigs into there which the chooks would then find. It might take a while, but might be worth a try. (Of course the chooks will need supervising too, being generally pretty destructive things!)

Her suggestion got me thinking during the night and so this morning I chased four of the girls into the raspberry patch where they got to work scratching and gobbling up earwigs from under the mulch.
Thanks Liz, I'm not able to let the chickens into other newly planted areas as yet, but your idea about having some mulch off to one side where the earwigs will learn to take shelter is brilliant. Once they have the habit of sleeping in the mulch during the day, I can let the chickens scratch at the mulch without them actually entering the garden and tender plants.
I feel like we may be onto something now.


Home baked sour dough, slathered with honey and Daisy's rich cream. A comfort food breakfast was the order of the day this morning after all the early morning chores were done.

Thanks for your visit and I hope your day is extra special, with plenty to be grateful for.


Tuesday, 24 November 2015

I knew it was going to be a good day


 I knew it was going to be a good day when the pair of knickers flicked out from the crumpled sheet and fell into the peg bucket instead of onto the dirt under the wash line.

It's Summer time. The paddocks are dry and the "lawn" is dead because we don't waste water on lawns, but the plantings around the verandah and close to the house create a visually cooling effect. Some geraniums, a Glory vine, agapanthas and various shrubs that require little to no water.

If you haven't been reading Rhonda's blog,  Down to Earth,  today's post "Controlling Your Own Life" is another winner that resonates with me so I'd like to share with you.


Jembella Farm shop is steadily growing in popularity as word gets out there. I'm having so much fun playing "shops".

I hope you're having a great day too. May your wet knickers not fall in the dirt when hanging on the wash line.


Monday, 23 November 2015

Mulga Bill is in Demand


                                 Blossom is thriving and is now three weeks old.


The feed bin containing the minerals for the cows is wired onto a post inside their shelter shed to keep it dry. 
Himalayan Pink Salt for the natural salts and minerals, Dolomite powder for calcium and magnesium and a commercially made mineral block without urea. Most blocks contain urea but we don't use any of that kind of artificial stuff on our organic property so we have to really hunt for a block that doesn't contain urea.


Mulga Bill is in demand, thanks to a Gumtree advert, and will be visiting another property next month to spend six weeks with a mob of heifers. The advert has been so successful that he is now booked up solid until June 2016 with a short spell back here to mate Lavendar in March.

Having our own bull has taken away the pressure of finding a person to AI our cows at the correct time when we want them to become pregnant. However, there are times when we don't want our cows or heifers to be impregnated by the bull so this is when it is time for him to go elsewhere.
Read my previous blog on Artificial Insemination here 
He loads easily onto the trailer with a little bribing, and is always happy getting off at his destination, ready for "work".


Last week he got a barley grass prickle in his eye. We moved him into the yards and into the crush where Brian searched and found the offending grass seed lodged at the back of his eye. With tweezers and a deft hand, he removed the pesky prickle and squirted the contents of a Cod Liver Oil capsule into the eye. We could have put honey in the eye instead, which is a good remedy for eye irritations, but the bottle of Cod Liver Oil capsules were close to hand and we had no time to spare once we had him in the crush.
It was another one of those situations where were mighty pleased to have made the effort to build a strong yarding system with a crush. 
If I could give one piece of advice to anyone planning on adding cattle to their property, it would be to make sure you have good yards with a crush for those times of health management. If we had not removed the prickle from his eye, nor had any means of confining him for treatment, he would have suffered many weeks of pain and discomfort and possibly have gone blind.
We use Vitamin A in the form of Cod Liver Oil capsules as a preventative measure with any irritations that may cause Pink Eye, which is more prevalent in animals that are deficient in Vitamin A and in dry dusty conditions. Generally, conventional farmed properties using artificial fertilizers that lock up the minerals in the soil will have stock that are more susceptible to Pinkeye. Here on our bio-dynamic and organically managed pastures we are not seeing any Pinkeye or eye irritation apart from those cases caused from grass seeds, which are not really Pinkeye anyway, but seem to be lumped into the same category. 
In our early days here we were taking the advice of a conventional farmer and lambing in February. Our lambs were getting Pink Eye from the dry dusty conditions. We soon realised that there is nothing logical about lambing in the late stages of Summer when feed is scarce and the paddocks were reduced to dust. Our conventional farmer friend is still lambing in February, still getting Pinkeye in his lambs, and still wondering why.
We moved to lambing in May, when the paddocks are green, and are experiencing no pinkeye at all in our healthy fat lambs with the ewes in good condition.
Our books written by Pat Coleby are invaluable to us and I can highly recommend either "Natural Farming" or "Natural Cattle Care" for gaining a wealth of information

Thanks for visiting the blog. Take a minute to leave a comment or ask any questions if I haven't explained something clearly.
Our farming life has become so ordinary and normal to us and the remedies we use are just the normal way we do things.  I forget that I should be explaining things very carefully and not take it for granted that folks already know this stuff.


Friday, 20 November 2015

Tomato Growing and Taking Cuttings


Brian started pruning the tomato plants and of course all those lovely prunings could not be wasted. So here we go again, striking them in water before I'll plant them into other parts of the garden just as soon as the roots appear. There were so many cuttings and I couldn't bear to waste any of them.  I wrote about striking cuttings from tomato plants here last year.


 I'm battling earwigs in my section of the vegetable garden where they love to eat cucumbers, beans, zucchinis and pumpkins, but they don't seem so fussed about the tomato plants. After much patience and vigilance the beans are finally away and starting to climb up the trellis. 
I've also planted cucumbers along the trellis at the other end, but they are slow to get away.
Zucchinis and dwarf beans are trying to emerge through the soil, some being eaten off before they become visible to me, but a few are surviving. They are growing in the small round circular "protection" barriers.

I've sprinkled a variety of things to try deterring the earwigs including ash from the fire, coffee grounds and ground up egg shells.
 Fifty percent shade cloth covers the entire vegetable garden during our scorching summers here in South Australia. 

 The earwigs numbers are such a huge problem and when I mulch around my plants they are even worse. I would love to hold the moisture into the soil but the earwigs love mulch.   
It is so frustrating to see the gardening programs on TV with lots of mulch and plants that leap up and out of the ground looking luscious. Short of moving to another area, what can I do?
 I love to hear about what other gardeners are growing at this time of year.
How is your vegetable garden going? What are you growing and have you taken cuttings from your tomato prunings? 
Have you any suggestions about how we could control our earwig numbers without using chemicals? I have traps which I empty every day and feed to the chooks, but the numbers don't diminish.
Happy gardening.

Monday, 9 November 2015

Bees, Guest blogger on Eight Acres, the blog.


Today is an exciting day for me. 
I've been reading and enjoying Eight Acres blog for approximately the past year.
Farmer Liz writes about Farming and Homesteading in a down to earth, Queensland kind of way....... because she's a Queenslander.  
She's a no nonsense, environmentally aware and sustainable living young woman who writes about things that interest me and I admire her values and attitude to life.
I think, if ever we met, we would get along like a house on fire and could probably spend hours talking about our animals and the stuff we do on our farms and our attitudes to things in general.
My daughter Lizzie says, "Mum, her blog is so like you, she could be your twin".
Well today I'm mighty chuffed to be featured in her blog by way of a Question and Answer about some of our methods of bee keeping.
Here is the link if you want to have a read. 
 http://eight-acres.blogspot.com/2015/11/getting-started-with-beekeeping-sally.html


Sunday, 8 November 2015

A New Calf - Blossom

 Lavender surprised us on Thursday morning with this healthy calf born six days early.  She was due on November 11th, but this being her first pregnancy, we were aware that she might calve early.
Her udder had bagged up during the last two days, so we separated her from the other cows on Wednesday night, into a paddock close to the house so we could hear her during the night if there was any action.
We were up at 6am as usual, and there she was in the paddock, eating the afterbirth with the healthy heifer calf standing up next to her.
We were so excited to see that she had successfully calved with no problems. Calving is always an anxious time for me, and especially when it's a heifer having her first calf.
Lavender was unconcerned that we were there to check them both and happily stood while we guided the calf towards her udder and watched as she took her first drink.
Waiting for a new calf to find the udder and then the teat, is one of the most frustrating things. I'm always concerned that the calf will not get its first drink soon enough, so there were great sighs of relief when the calf suckled and then went back for more all on her own a few minutes later.
So the first name to come into my head was Blossom, as it seems to be that we are following a floral theme in the naming of our recent cows.
Lavender's breed is half dairy (Jersey) and half beef (Murray Grey). We raised her from three days old when we bought her from a Jersey dairy in 2013. She was fostered to Bella who was our house cow at the time. Unable to get a bull calf at the time, we took a heifer as second choice because we needed to find a calf in a hurry to help use up some of Bella's milk.
Intending to grow her to sell, or to eat, she was six months old when we decided that she would make a perfect small house cow for our small acreage. Being half beef breed she will not produce as much milk as a full dairy breed, will not eat as much, and if we mate her to our beef bull, her calves will be beefy and meaty.

Yesterday her udder was looking very full and tight as three days had passed since calving. We want her for a house cow so it was time to bring her in to milk her for the first time to show her what a dairy cow is supposed to do.
Anyone who knows cows will tell you that the first few times of milking a new heifer are full of stresses and problems, and that the cow must be coaxed to get her to stand to be milked.
So we brought her down from the paddock with Daisy at milking time in the evening. Her calf (Blossom) was asleep over in the far corner so Lavender came down easily and stood waiting while Daisy went into the dairy to be milked.
When it was Lavender's turn we followed the same routine with her that we have been doing for months leading up to her calving. She already knew about eating a delicious mix of molasses and chaff from the feeder with the bales on her neck.
Brian had taught her to have a leg rope attached to her hind leg weeks ago. All that remained was the actual milking machine cups to be attached to her udder.
Neither of us could believe how she stood and made no fuss at all, just like she had been milked for years.

 Her fifth teat is just visible in this picture.

We took approximately three litres of milk, just enough to relieve the tightness in her udder, but left plenty for the calf to drink.
These first days are more about teaching her to associate calving with being a milking cow and getting her accustomed to the routine, so it is important to avoid any stresses or create bad memories for her at this time. They imprint all of these things firmly in their mind and the consequences could be felt at a later stage.
She has never had a bad experience in the milking shed so she is totally relaxed with the whole experience at this stage.
We plan on sharing the milk with the calf and will leave Blossom with her until weaning time.
The fifth teat is quite prominent but we will not squeeze or try to milk it hoping that it will shrivel and shrink. There are definitely only four quarters, and we need to try to ignore the surplus teat. If we manipulate it she could possibly get mastitis caused by milk remaining in that section. Now we hope that the calf doesn't suckle it.


Today was the fourth day after calving and we followed the same routine with her. The calf was asleep and Lavender came in and behaved perfectly again.
Tonight we took only one litre and her milk is really creamy, that's the Jersey in her, with no colostrum remaining at all.

 Daisy is stress free in the dairy with the leg rope attached.

The leg rope is accepted well by both cows. They were introduced to it slowly.
Firstly by handling the leg and rubbing it all over while talking reassuringly. Do each stage of the training for some days until going onto the next step.
Then put a rope around the leg, hold the rope firmly but not attached or knotted. They will get used to the feel of the rope while still having access to moving the leg.
Then start to put pressure on the rope, pulling the leg back. They will try to kick it off, but not maliciously. They treat it as more of an inconvenience, like dislodging a fly, but will learn to put their leg back in the position quite quickly.
When leg roped, they can't kick forward and our job of putting milking cups onto the teats is much safer.
Daisy is such an old hand at it now. All that is required to ask her to put her leg back is a slight pressure, or pat, on her flank.
All of our cows, past and present, come into the dairy easily because they enjoy the experience. Well, what's not to like?
A delicious feed of chaff, bran and molasses while the pressure is taken off the udder. Then they are released into the holding paddock where hay is waiting to be eaten, before sauntering back to one of the big paddocks to eat grass, chew cud and sleep all day.
Oh yes, it's a cow's life.

I hope your weekend has been as enjoyable as ours.
Have you got a new addition to your property?
Isn't it wonderful having a "baby in the house" again?


Thursday, 5 November 2015

Collecting a Swarm of Bees


Bee season is here and Brian has collected two swarms from back yards in the town during the past week.  Why bees swarm 
Aside from word of mouth in our community, we also put a small advert on our local Classifieds page on Facebook to let people know that Brian will collect the bees at no cost to them.
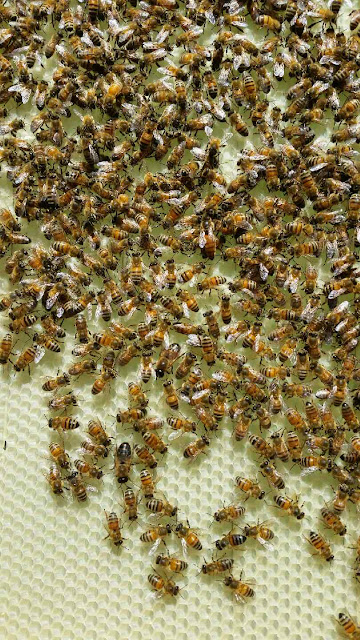
Collecting swarms is a great way to boost bee numbers in our hives and in this blog Brian explains the process of collecting a swarm.


The first thing I like to do when someone rings me to say they have a swarm of bees in their yard is to find out how big the swarm is and where it is situated. This way you will know what equipment you will need to retrieve the bees. 
For instance, what size ladder you will need for the job. 
The best way to ascertain the size of the swarm, is to ask the caller to compare it to something.
I start with a football. That's around 10,000 bees and work my way up. 
This is important because you need to know what size box to bring with you; either a nuc (newk, a 4 framed box) or a full sized box which has 10 frames. 
A small swarm the size of a football would not do well in a full sized box because there are not enough bees to keep the temperature correct in the box and they could die.
Right, that sorted, I head to my shed feeling exited to collect a new swarm!
I grab my bee suit, smoker, hive tool and brush. Then a bee box and frames, pruning saw and snips (secateurs). 
I do make a habit of keeping all my tools together in a box so all I need to do is grab the box because usually, by the time I get the phone call, the swarm has been there for a couple of days and could take off at any time .

 
When I arrive at the property, and if the swarm is hanging off a branch in the garden, I set up my box under the swarm and take the lid off the bee box. 
I then very slowly cut the branch off the tree around 50mm above the bees, being very careful not to bump the swarm.  They are very fragile at this stage and will fall off the branch very easily. You don’t want that to happen because you could lose the queen and then there is no way the bees will stay in your box. 
So anyway, I have cut off the branch with the bees still hanging off it nicely, and very slowly lay them on top of the bee box with the lid off.  The bees should now walk down the frames and start making their new home. 
If you see the bees look unsettled and lost, not sure what to do, there is a good chance the queen has died.
(You will need to get a frame of brood so they can make a new queen.) ** We will cover this part later.
You must remember the existing queen is the old queen from the original hive and getting close to the end of her life.
Right, if all went well and the queen is OK, and the bees are going into the box, put the lid back on the box and leave them undisturbed so they can settle in.
Return just on dark when all the bees have gone into the hive, close the trap door at the entrance of the box and take your babies home.
Now, before you get them home you need to make a decision; 
Do you want them to form a new hive? 
or 
Do you want to unite them with another hive to build the numbers up quickly in the hive you have at home already?

In our next blog about bee keeping, Brian will explain how to unite the new swarm with an existing hive.

Wiring a frame before embedding the wax foundation onto the wire for the bees to start building their wax cells onto.


A fresh beeswax foundation before the bees have started building the cells.


Manual lifting the hives onto the ute or trailer when we want to move them to a new location was getting too difficult for us. They are really heavy, especially when three boxes high, so Brian fixed up some old cheap trailers to leave the hives on permanently.
When it's time to move to another location, he waits until dark to ensure the bees have returned from their day's gathering activities, closes the doors on the hives, slides the hives closer together, lifts the tail gate, hooks up to the ute and drives.
There are less sessions at the Chiropractor for us now that we do it this way!

Thanks for dropping by and don't forget to leave a comment or ask questions.

These are a couple of blogs I love to read and you might also enjoy them;

Eight Acres

Down to Earth


Monday, 2 November 2015

Granny's Mayonnaise

Mayonnaise and salad dressings are big business. Yet they are so very easy to make. Not only can we save lots of dollars, we can make them from scratch using real ingredients that most of us have in our store cupboards and pantries.
I haven't bought any salad dressings for many years, but I know there are plenty of weird synthetic ingredients in most of them.

Recipes for every type of salad dressing are at our fingertips if we look on line and in recipe books. Some are more complicated than others.

My family have a favourite that has been passed down from our Granny Opie. It's a creamy style dressing which, when mixed with yogurt, makes a luscious potato salad and is also good in coleslaw. We use it on a tossed salad sometimes instead of vinaigrette, and on sandwiches, especially chicken, and oh, can't forget the good old egg sandwiches.


Granny's Mayonnaise

1/2 cup of sugar
1 dessertspoon plain flour
1 teaspoon mustard powder
1/4 teaspoon salt
1 egg
3/4 cup milk
3/4 cup white vinegar

In a double boiler, mix dry ingredients together first.
Using a whisk, stir in the egg, half the vinegar, then half the milk.
Whisk until well blended, then add the remaining milk and vinegar and whisk again.
Whisk gently over heat until mixture thickens and comes to boiling point.
Pour into a jar when it has cooled a little.
Cover and store in fridge.


This is my double boiler. A stainless mixing bowl perched on top of a saucepan of hot water.  When I was younger I would always think, when I saw a recipe using a double boiler, "Oh I can't make that, I don't have a double boiler!"
Ha! I had to learn to be resourceful through need. It works perfectly well and to this day I don't know what a real double boiler looks like.
I always make a double batch of this mayo as it keeps well in the fridge for months and being a lazy cook, it takes the same effort to make double.

Into another jar, mix half Mayonnaise with half yogurt and stir well.
This is a creamy dressing for the most delicious potato salad, coleslaw dressing and for using in  sandwiches etc.

We still call it Granny's Mayo, but I know that Granny never added yogurt when she used it, so we've brought it into the twenty first century with a slight adaptation.

Have you got a family favourite dressing that you always go to?  And how have you adapted it to our times?

Thanks for dropping by and I hope you are motivated to try making mayo from scratch.


Related Posts Plugin for WordPress, Blogger...