Tuesday 14 July 2015

Lemon Syrup

                                                                    
At last we're getting some rain and real wintery weather here in South Australia.  I may have mentioned once or twice, I love Winter.  What's not to love about snuggling into thick socks, rubber boots, layers of jumpers, coats and scarves. Putting another log on the fire with the kettle on the hob whistling quietly, companionably. Leaping out into the weather to bring the cows down from the hill for milking time, feeling the soft rain on my face. Invigorating joy.
                                                                 

And suddenly citrus is in abundance again.
I love to make our own drinks and cordial syrups.  In summer it's lovely to have lemon syrup/cordial on hand for adding to water or soda water.  In winter it's delicious added to black tea or hot water for a warming lemony drink.
This syrup is not cooked, so the essential oils from the skins remain and are captured in the bottle.

Lemon Cordial 
6 lemons
1kg sugar
1 dessertspoon citric acid
4 cups boiling water
Grate the zest from the lemons. Cut lemons in half and juice. Place in a container with the sugar and citric acid. Pour over boiling water. Stir until sugar is dissolved. Cover and leave overnight.
Strain through a sieve and pour into sterilised bottles. Seal. Store in fridge after opening.


                                                                 I made a double batch. 
A friend has given me some oranges from her tree so I'm going to have a go at making some orange cordial in the next few days.
                                                                         

I picked our first broccoli for the season and we ate it lightly steamed for dinner. I can't remember who told me about this but I'll share it with you just in case you don't know. Be sure to cut the broccoli off at an angle so the remaining stem doesn't become waterlogged and cause the rest of the plant to rot. There are little broccolini forming all the way along the stem between the leaves. These will continue for many months, providing many more meals.
I hope you're getting some good winter rains wherever you are.
                                                                           

Friday 10 July 2015

Making Butter

I bought this old Sunbeam Mixmaster a few years ago when we got our first cow Jemima. A beautiful Jersey who's milk had a very high cream content. I taught myself to make butter to use up some of that cream and now make all of our butter, usually once a week.
If you are lucky enough to have your own grass fed cow on your organic property, or are able to access raw cream from an organically raised cow that isn't fed grain, you can make the most nutritious butter that is actually good for you. Yes, butter is NOT bad.
For more info on health benefits of butter read Nourishing Traditions- Weston A Price  Foundation
Use cream that is a few days old to make butter. It will "turn" or "clabber" faster.
Take it out of the fridge in the morning so that it is at room temperature if you are making it in the afternoon. Or if you want to make it in the morning it would be best to remove it from the fridge the night before.
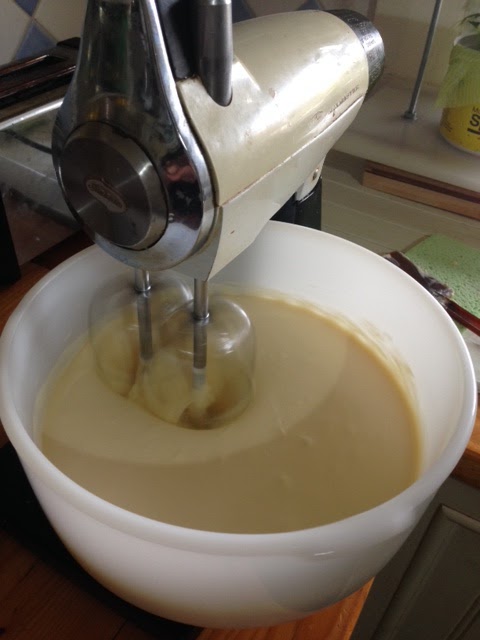
Never fill your mixer bowl to more than half full, to allow the cream to move around, and prevent splashing all over the bench tops and everything around you.
Set the mixer to the Whip Cream setting and watch while the cream turns from runny, to whipped, to butter and then splits.


Use a pliable spatula to move the outside cream into the centre for even mixing. 
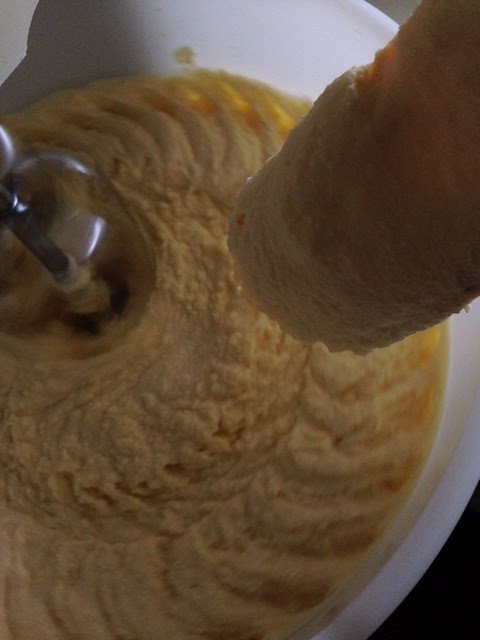
Notice the colour changing to a more butter yellow. During our South Australian summer when the cows are being fed dry feed, the butter is much lighter in colour. As soon as the paddocks green up, the butter becomes yellower.

This is the stage at which the cream has turned to butter. Slow your mixer just before it gets to this point to avoid lots of buttermilk splashing out of the bowl.


Squeeze a small amount with your fingers to feel the buttery texture, taste it, it's butter.


Scrape the butter from the beaters with a knife.

                                                                           
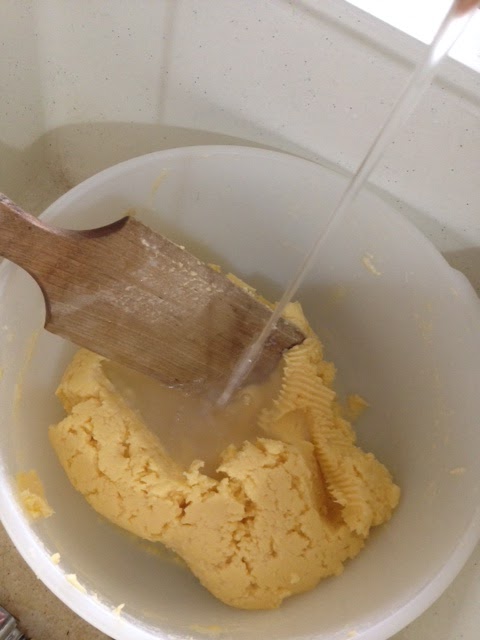
Wet your butter pats with cold water to ensure the butter doesn't stick to them.

Using a wet butter pat, move the butter to one side while squeezing out the buttermilk.


Carefully tip the buttermilk into another container and put aside. 


 Wash the butter three times with cold water, moving it around with the butter pat, until the water runs clear. Our's is rain water and during winter is cold enough, but during summer I use refrigerated water. Approximately three litres will do.  If the water is even a little bit warm, the butter will become too soft to handle.
I salt my butter because we love the taste and it also helps to keep longer.  I use either Himalayan Pink Salt or a good sea salt.  This batch of butter was approximately five cups of cream to which I would add two teaspoons of salt after washing. This is to our taste though, so you should salt it to your taste.
                                                                              
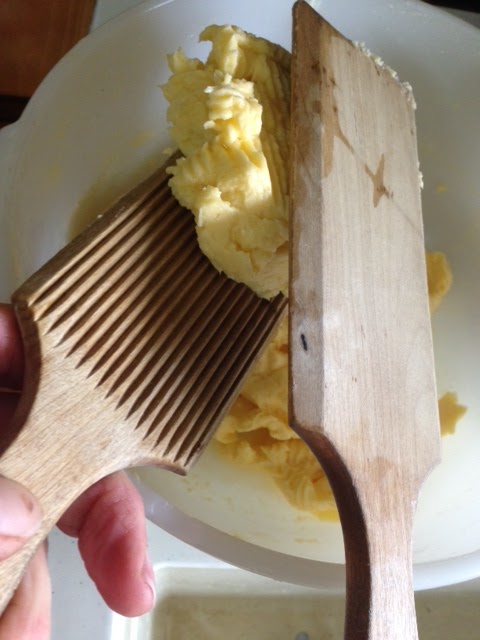
This bit takes a bit of practice, so you could do as I did in the beginning. I used one butter pat, because I owned only one at the time. Pick up a small portion to the size you want, squeeze lightly between your hand and the pat to remove as much liquid as possible. Squeeze and shake over the sink or bowl. Then place it onto the dampened bench or board.
                                                                      
Using your hand and one pat, or once you get the hang of it, two pats, shape it into a square or rectangle shape. You will notice that more liquid oozes out. Wipe the board with a wet cloth after each piece is shaped.
                                                                       

I use a cheaper brand of greaseproof paper to wrap the portions. It doesn't need to be the cooking parchment paper which is far more expensive.
                                                                           
Writing the date on each portion helps me to keep track of which butter to use first. Sometimes I weigh into specific size portions and write the weight next to the date.
                                                                       
Place into a zip lock bag, removing as much air as possible before placing into the freezer.
If you are going to use vacuum sealer bags you will need to freeze the butter portions first. I can tell you from experience that vacuum sealing fresh butter doesn't work very well unless you want flat butter!
I take a portion from the freezer when we are almost out of butter in the fridge. This "real" butter with no additives or colorings, from a cow that eats as nature intended, fresh grass and hay (dried grass), has a lower melting point than the shop purchased butter. ie it spreads almost straight from the fridge. Because it doesn't contain any preservatives, apart from the salt, it will not keep as long as commercially produced butter so make your portions a size that you will eat within approximately one week.
It is just like any foods that we make from scratch without using preservatives. That's why we make food from scratch isn't it?
                                                                           
And now the butter milk. Date it and keep in a jar in the fridge to add to so many dishes and baked goods.
This is not the buttermilk that we see in the shops. That is cultured buttermilk. This is the real butter milk left over from making butter. We can make it cultured by leaving out on the bench at room temperature for approx 12 hours until it starts to ferment and gets bubbly.  Then put it back into the fridge. At this point it is even better for using in bread making (substitute it for some of the liquid), cakes etc. It aids the rising agent or yeast, depending on what you are making.


Friday 3 July 2015

Butchers, dogs and farming tales.

Warning to vegetarians.... this first picture may offend.

When I first started out writing a blog I thought I'd easily manage twice a week, there's so much to write about, but the reality is that there just isn't the spare time.
I write my blog for my family and friends to let them see what's happening here, and am really thrilled to have a few other followers as well.
So I'm just going to write about what's been happening here over the past couple of weeks since my last blog.
                                                                  

     Our on-farm butcher was here last week to process Bubble. As far as butchering goes, this is the best possible method of dispatching an animal. I can tell you, there is no stress at all for the animal.  The second before death this steer was eating grass in his paddock without a care in the world.
No transporting on a truck, no standing around in an abattoir waiting it's turn and feeling terror. The difference in the meat quality is incredible.  Some of the meat was shared among friends and our third chest freezer is now full.
I rendered down much of the fat to make dripping, of course, and a batch of soap was made using dripping and macadamia oil.
                                           
                                                    Foster calves Jordie and Blackie.
                                                       
                                                                         
                                                             Daisy's calf, Dusty.

The calves are now eleven weeks old and will continue to get milk until they are around sixteen to twenty weeks.
Every morning I hand feed the two foster calves with milk that I save from milking Daisy the previous day. At the same time, I separate all of the three calves into another paddock for the day, so that I can bring Daisy into the dairy in the evening for milking. We get enough milk for our use in the kitchen for yoghurt, cheese and cream, as well as saving some to heat up for the calves the next morning. I only need to milk once per day now.
All three calves get to spend the nights with Daisy so they can top up on milk feeds as they like and as Daisy allows them to.
  
                                                                
                                                                              Allen

Our dear old boy Max left this world last month which is still very raw and painful to talk about. As a large breed, he exceeded his expected life span by more than a couple of years, and at eleven and a half years old, his hips were in a poor state. After some months on pain killers, it was finally time to end his struggle with the pain.
                                                                                 

     Our much loved Max who lived a long life,but is so very missed by all who knew him.

We knew we would probably take in another dog but weren't actively looking, believing that a dog would find us when the time was right. Meanwhile all of our love and focus was on darling little Meg the Kelpie.
Brian had shown some interest in a dog that was advertised on Gumtree, he (the dog) ticked all the boxes for us, but he was obviously so perfect he was snapped up within a few hours of posting the ad. We thought no more about it but last Saturday we were contacted by the owners asking if we were still interested in the dog. To their credit, they weren't going to let the dog go to anyone they didn't feel was quite right. We took Meg to meet him, all went well, was love at first sight from Brian and I, so we brought lovely little Allen home with us. He is nine months old, the same age as Meg, has been de-sexed, micro-chipped, obedience trained and has such a chilled personality; like he's been with us for ever.
His mother is an Australian Shepherd but his father is a mystery, perhaps Staffy? We don't care what he is, he's just beautiful.

                                                              
                                                              It's cold outside!

  I love winter. Did I mention that once or twice in the past? I love the way it makes me feel motivated to get outside and do stuff.  I love cooking in and on the wood stove, soups, stews and lovely puddings with lashings of fresh cream.
It's really freezing cold now though, temps down to zero these past few nights and some frosts. I'm trying to be frugal with the firewood, but luckily Brian keeps a steady supply for me to burn. With two fires burning around the clock, the kitchen and living room, I'm really chewing through it so we'll have a wood cutting afternoon on Sunday.


  Burning a pile of well dried garden clippings and sticks from the paddocks earlier tonight with glass of red wine to welcome the start of the weekend.
Have a lovely weekend, where-ever you may be. Ours will be a busy one as usual. There's a new fence to be built, butter to be made, a vegetable garden to be weeded, food to be cooked and shared.
Here is a funny little article, most of which I can relate to.  (10 things your non farm friends don't understand)  http://forfarmandranchwomen.com/2015/06/15/10-things-your-non-farm-friends-just-dont-understand/


Related Posts Plugin for WordPress, Blogger...