At last we're getting some rain and real wintery weather here in South Australia. I may have mentioned once or twice, I love Winter. What's not to love about snuggling into thick socks, rubber boots, layers of jumpers, coats and scarves. Putting another log on the fire with the kettle on the hob whistling quietly, companionably. Leaping out into the weather to bring the cows down from the hill for milking time, feeling the soft rain on my face. Invigorating joy.
And suddenly citrus is in abundance again.
I love to make our own drinks and cordial syrups. In summer it's lovely to have lemon syrup/cordial on hand for adding to water or soda water. In winter it's delicious added to black tea or hot water for a warming lemony drink.
This syrup is not cooked, so the essential oils from the skins remain and are captured in the bottle.
Lemon Cordial
6 lemons
1kg sugar
1 dessertspoon citric acid
4 cups boiling water
Grate the zest from the lemons. Cut lemons in half and juice. Place in a container with the sugar and citric acid. Pour over boiling water. Stir until sugar is dissolved. Cover and leave overnight.
Strain through a sieve and pour into sterilised bottles. Seal. Store in fridge after opening.
I made a double batch.
A friend has given me some oranges from her tree so I'm going to have a go at making some orange cordial in the next few days.
I picked our first broccoli for the season and we ate it lightly steamed for dinner. I can't remember who told me about this but I'll share it with you just in case you don't know. Be sure to cut the broccoli off at an angle so the remaining stem doesn't become waterlogged and cause the rest of the plant to rot. There are little broccolini forming all the way along the stem between the leaves. These will continue for many months, providing many more meals.
I hope you're getting some good winter rains wherever you are.
Bio-dynamics - Sustainable Living & Self Reliance - Raising Livestock Ethically for Food & Profit - Beekeeping - Frugal Living - Cooking & Preserving - Nutrition - Alternative Therapies - Growing Vegetables - Living the Dream
Tuesday, 14 July 2015
Friday, 10 July 2015
Making Butter
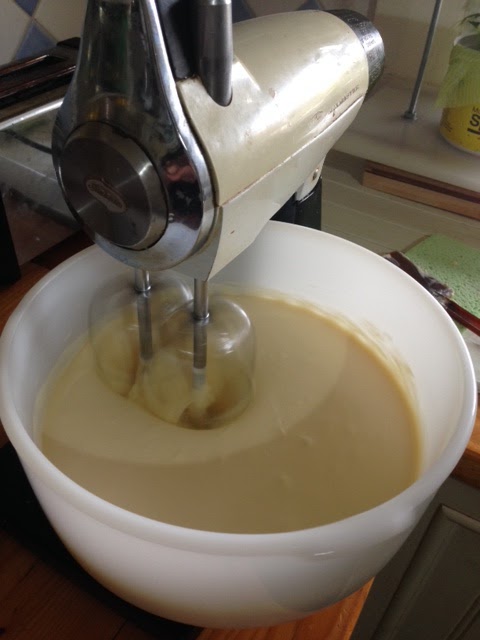
I bought this old Sunbeam Mixmaster a few years ago when we got our first cow Jemima. A beautiful Jersey who's milk had a very high cream content. I taught myself to make butter to use up some of that cream and now make all of our butter, usually once a week.
If you are lucky enough to have your own grass fed cow on your organic property, or are able to access raw cream from an organically raised cow that isn't fed grain, you can make the most nutritious butter that is actually good for you. Yes, butter is NOT bad.
For more info on health benefits of butter read Nourishing Traditions- Weston A Price Foundation
Use cream that is a few days old to make butter. It will "turn" or "clabber" faster.
Take it out of the fridge in the morning so that it is at room temperature if you are making it in the afternoon. Or if you want to make it in the morning it would be best to remove it from the fridge the night before.
Never fill your mixer bowl to more than half full, to allow the cream to move around, and prevent splashing all over the bench tops and everything around you.
Set the mixer to the Whip Cream setting and watch while the cream turns from runny, to whipped, to butter and then splits.
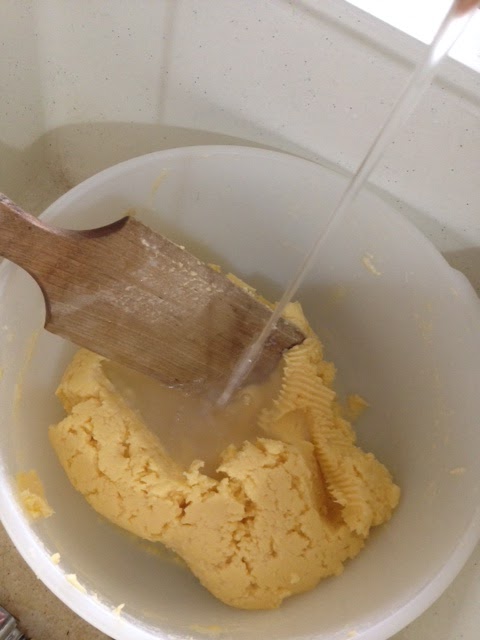
Wash the butter three times with cold water, moving it around with the butter pat, until the water runs clear. Our's is rain water and during winter is cold enough, but during summer I use refrigerated water. Approximately three litres will do. If the water is even a little bit warm, the butter will become too soft to handle.
I salt my butter because we love the taste and it also helps to keep longer. I use either Himalayan Pink Salt or a good sea salt. This batch of butter was approximately five cups of cream to which I would add two teaspoons of salt after washing. This is to our taste though, so you should salt it to your taste.
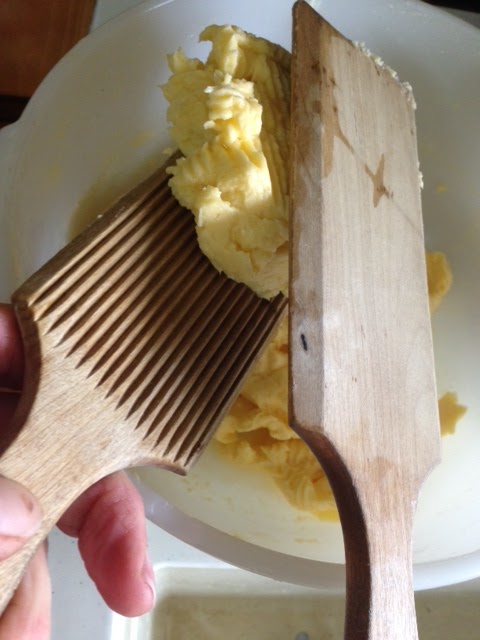
This bit takes a bit of practice, so you could do as I did in the beginning. I used one butter pat, because I owned only one at the time. Pick up a small portion to the size you want, squeeze lightly between your hand and the pat to remove as much liquid as possible. Squeeze and shake over the sink or bowl. Then place it onto the dampened bench or board.
Using your hand and one pat, or once you get the hang of it, two pats, shape it into a square or rectangle shape. You will notice that more liquid oozes out. Wipe the board with a wet cloth after each piece is shaped.
I use a cheaper brand of greaseproof paper to wrap the portions. It doesn't need to be the cooking parchment paper which is far more expensive.
Writing the date on each portion helps me to keep track of which butter to use first. Sometimes I weigh into specific size portions and write the weight next to the date.
Place into a zip lock bag, removing as much air as possible before placing into the freezer.
If you are going to use vacuum sealer bags you will need to freeze the butter portions first. I can tell you from experience that vacuum sealing fresh butter doesn't work very well unless you want flat butter!
I take a portion from the freezer when we are almost out of butter in the fridge. This "real" butter with no additives or colorings, from a cow that eats as nature intended, fresh grass and hay (dried grass), has a lower melting point than the shop purchased butter. ie it spreads almost straight from the fridge. Because it doesn't contain any preservatives, apart from the salt, it will not keep as long as commercially produced butter so make your portions a size that you will eat within approximately one week.
It is just like any foods that we make from scratch without using preservatives. That's why we make food from scratch isn't it?
And now the butter milk. Date it and keep in a jar in the fridge to add to so many dishes and baked goods.
This is not the buttermilk that we see in the shops. That is cultured buttermilk. This is the real butter milk left over from making butter. We can make it cultured by leaving out on the bench at room temperature for approx 12 hours until it starts to ferment and gets bubbly. Then put it back into the fridge. At this point it is even better for using in bread making (substitute it for some of the liquid), cakes etc. It aids the rising agent or yeast, depending on what you are making.
If you are lucky enough to have your own grass fed cow on your organic property, or are able to access raw cream from an organically raised cow that isn't fed grain, you can make the most nutritious butter that is actually good for you. Yes, butter is NOT bad.
For more info on health benefits of butter read Nourishing Traditions- Weston A Price Foundation
Use cream that is a few days old to make butter. It will "turn" or "clabber" faster.
Take it out of the fridge in the morning so that it is at room temperature if you are making it in the afternoon. Or if you want to make it in the morning it would be best to remove it from the fridge the night before.
Never fill your mixer bowl to more than half full, to allow the cream to move around, and prevent splashing all over the bench tops and everything around you.
Set the mixer to the Whip Cream setting and watch while the cream turns from runny, to whipped, to butter and then splits.
Use a pliable spatula to move the outside cream into the centre for even mixing.
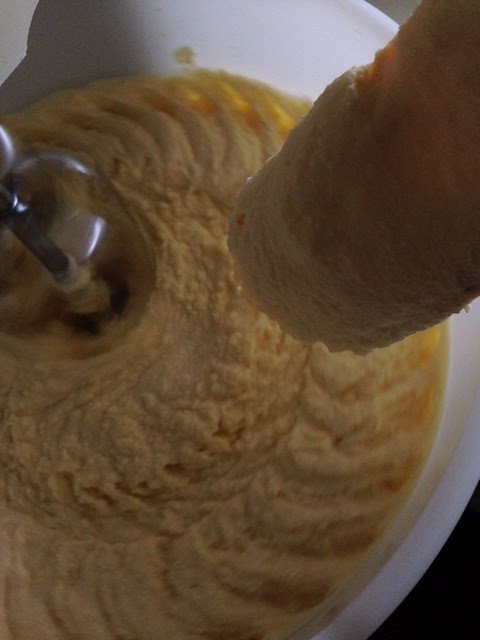
Notice the colour changing to a more butter yellow. During our South Australian summer when the cows are being fed dry feed, the butter is much lighter in colour. As soon as the paddocks green up, the butter becomes yellower.
This is the stage at which the cream has turned to butter. Slow your mixer just before it gets to this point to avoid lots of buttermilk splashing out of the bowl.
Squeeze a small amount with your fingers to feel the buttery texture, taste it, it's butter.
Scrape the butter from the beaters with a knife.
Wet your butter pats with cold water to ensure the butter doesn't stick to them.
Using a wet butter pat, move the butter to one side while squeezing out the buttermilk.
Carefully tip the buttermilk into another container and put aside.
I salt my butter because we love the taste and it also helps to keep longer. I use either Himalayan Pink Salt or a good sea salt. This batch of butter was approximately five cups of cream to which I would add two teaspoons of salt after washing. This is to our taste though, so you should salt it to your taste.
This bit takes a bit of practice, so you could do as I did in the beginning. I used one butter pat, because I owned only one at the time. Pick up a small portion to the size you want, squeeze lightly between your hand and the pat to remove as much liquid as possible. Squeeze and shake over the sink or bowl. Then place it onto the dampened bench or board.
Using your hand and one pat, or once you get the hang of it, two pats, shape it into a square or rectangle shape. You will notice that more liquid oozes out. Wipe the board with a wet cloth after each piece is shaped.
I use a cheaper brand of greaseproof paper to wrap the portions. It doesn't need to be the cooking parchment paper which is far more expensive.
Writing the date on each portion helps me to keep track of which butter to use first. Sometimes I weigh into specific size portions and write the weight next to the date.
Place into a zip lock bag, removing as much air as possible before placing into the freezer.
If you are going to use vacuum sealer bags you will need to freeze the butter portions first. I can tell you from experience that vacuum sealing fresh butter doesn't work very well unless you want flat butter!
I take a portion from the freezer when we are almost out of butter in the fridge. This "real" butter with no additives or colorings, from a cow that eats as nature intended, fresh grass and hay (dried grass), has a lower melting point than the shop purchased butter. ie it spreads almost straight from the fridge. Because it doesn't contain any preservatives, apart from the salt, it will not keep as long as commercially produced butter so make your portions a size that you will eat within approximately one week.
It is just like any foods that we make from scratch without using preservatives. That's why we make food from scratch isn't it?
And now the butter milk. Date it and keep in a jar in the fridge to add to so many dishes and baked goods.
This is not the buttermilk that we see in the shops. That is cultured buttermilk. This is the real butter milk left over from making butter. We can make it cultured by leaving out on the bench at room temperature for approx 12 hours until it starts to ferment and gets bubbly. Then put it back into the fridge. At this point it is even better for using in bread making (substitute it for some of the liquid), cakes etc. It aids the rising agent or yeast, depending on what you are making.
Friday, 3 July 2015
Butchers, dogs and farming tales.
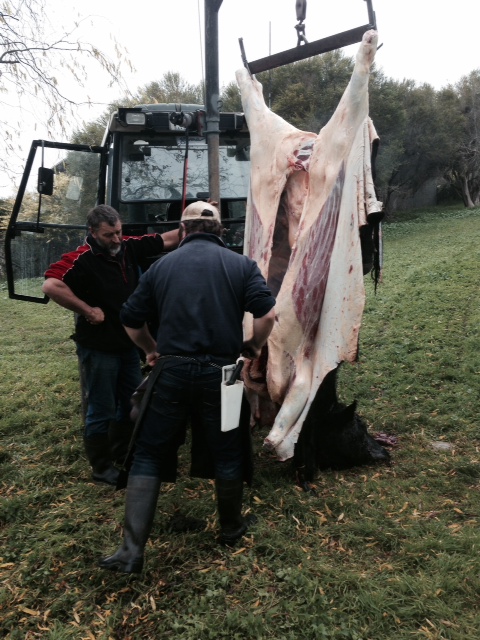
Warning to vegetarians.... this first picture may offend.
When I first started out writing a blog I thought I'd easily manage twice a week, there's so much to write about, but the reality is that there just isn't the spare time.
I write my blog for my family and friends to let them see what's happening here, and am really thrilled to have a few other followers as well.
So I'm just going to write about what's been happening here over the past couple of weeks since my last blog.
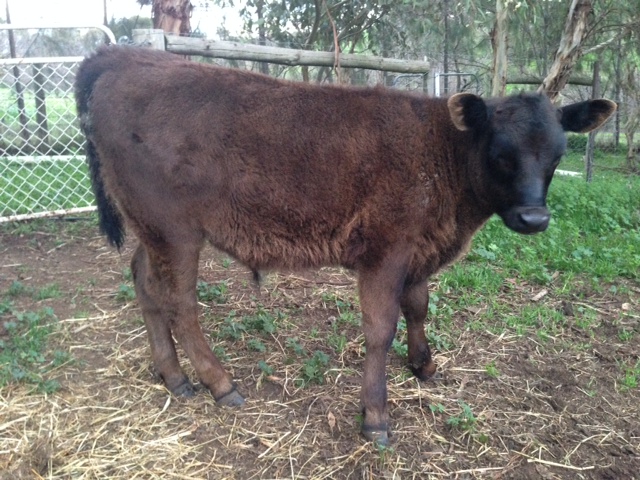
Our on-farm butcher was here last week to process Bubble. As far as butchering goes, this is the best possible method of dispatching an animal. I can tell you, there is no stress at all for the animal. The second before death this steer was eating grass in his paddock without a care in the world.
No transporting on a truck, no standing around in an abattoir waiting it's turn and feeling terror. The difference in the meat quality is incredible. Some of the meat was shared among friends and our third chest freezer is now full.
I rendered down much of the fat to make dripping, of course, and a batch of soap was made using dripping and macadamia oil.
Foster calves Jordie and Blackie.
Daisy's calf, Dusty.
The calves are now eleven weeks old and will continue to get milk until they are around sixteen to twenty weeks.
Every morning I hand feed the two foster calves with milk that I save from milking Daisy the previous day. At the same time, I separate all of the three calves into another paddock for the day, so that I can bring Daisy into the dairy in the evening for milking. We get enough milk for our use in the kitchen for yoghurt, cheese and cream, as well as saving some to heat up for the calves the next morning. I only need to milk once per day now.
All three calves get to spend the nights with Daisy so they can top up on milk feeds as they like and as Daisy allows them to.
Allen
Our dear old boy Max left this world last month which is still very raw and painful to talk about. As a large breed, he exceeded his expected life span by more than a couple of years, and at eleven and a half years old, his hips were in a poor state. After some months on pain killers, it was finally time to end his struggle with the pain.
Our much loved Max who lived a long life,but is so very missed by all who knew him.
We knew we would probably take in another dog but weren't actively looking, believing that a dog would find us when the time was right. Meanwhile all of our love and focus was on darling little Meg the Kelpie.
Brian had shown some interest in a dog that was advertised on Gumtree, he (the dog) ticked all the boxes for us, but he was obviously so perfect he was snapped up within a few hours of posting the ad. We thought no more about it but last Saturday we were contacted by the owners asking if we were still interested in the dog. To their credit, they weren't going to let the dog go to anyone they didn't feel was quite right. We took Meg to meet him, all went well, was love at first sight from Brian and I, so we brought lovely little Allen home with us. He is nine months old, the same age as Meg, has been de-sexed, micro-chipped, obedience trained and has such a chilled personality; like he's been with us for ever.
His mother is an Australian Shepherd but his father is a mystery, perhaps Staffy? We don't care what he is, he's just beautiful.
It's cold outside!
I love winter. Did I mention that once or twice in the past? I love the way it makes me feel motivated to get outside and do stuff. I love cooking in and on the wood stove, soups, stews and lovely puddings with lashings of fresh cream.
It's really freezing cold now though, temps down to zero these past few nights and some frosts. I'm trying to be frugal with the firewood, but luckily Brian keeps a steady supply for me to burn. With two fires burning around the clock, the kitchen and living room, I'm really chewing through it so we'll have a wood cutting afternoon on Sunday.
Burning a pile of well dried garden clippings and sticks from the paddocks earlier tonight with glass of red wine to welcome the start of the weekend.
Have a lovely weekend, where-ever you may be. Ours will be a busy one as usual. There's a new fence to be built, butter to be made, a vegetable garden to be weeded, food to be cooked and shared.
Here is a funny little article, most of which I can relate to. (10 things your non farm friends don't understand) http://forfarmandranchwomen.com/2015/06/15/10-things-your-non-farm-friends-just-dont-understand/
When I first started out writing a blog I thought I'd easily manage twice a week, there's so much to write about, but the reality is that there just isn't the spare time.
I write my blog for my family and friends to let them see what's happening here, and am really thrilled to have a few other followers as well.
So I'm just going to write about what's been happening here over the past couple of weeks since my last blog.
Our on-farm butcher was here last week to process Bubble. As far as butchering goes, this is the best possible method of dispatching an animal. I can tell you, there is no stress at all for the animal. The second before death this steer was eating grass in his paddock without a care in the world.
No transporting on a truck, no standing around in an abattoir waiting it's turn and feeling terror. The difference in the meat quality is incredible. Some of the meat was shared among friends and our third chest freezer is now full.
I rendered down much of the fat to make dripping, of course, and a batch of soap was made using dripping and macadamia oil.
Foster calves Jordie and Blackie.
Daisy's calf, Dusty.
The calves are now eleven weeks old and will continue to get milk until they are around sixteen to twenty weeks.
Every morning I hand feed the two foster calves with milk that I save from milking Daisy the previous day. At the same time, I separate all of the three calves into another paddock for the day, so that I can bring Daisy into the dairy in the evening for milking. We get enough milk for our use in the kitchen for yoghurt, cheese and cream, as well as saving some to heat up for the calves the next morning. I only need to milk once per day now.
All three calves get to spend the nights with Daisy so they can top up on milk feeds as they like and as Daisy allows them to.
Allen
Our dear old boy Max left this world last month which is still very raw and painful to talk about. As a large breed, he exceeded his expected life span by more than a couple of years, and at eleven and a half years old, his hips were in a poor state. After some months on pain killers, it was finally time to end his struggle with the pain.
Our much loved Max who lived a long life,but is so very missed by all who knew him.
We knew we would probably take in another dog but weren't actively looking, believing that a dog would find us when the time was right. Meanwhile all of our love and focus was on darling little Meg the Kelpie.
Brian had shown some interest in a dog that was advertised on Gumtree, he (the dog) ticked all the boxes for us, but he was obviously so perfect he was snapped up within a few hours of posting the ad. We thought no more about it but last Saturday we were contacted by the owners asking if we were still interested in the dog. To their credit, they weren't going to let the dog go to anyone they didn't feel was quite right. We took Meg to meet him, all went well, was love at first sight from Brian and I, so we brought lovely little Allen home with us. He is nine months old, the same age as Meg, has been de-sexed, micro-chipped, obedience trained and has such a chilled personality; like he's been with us for ever.
His mother is an Australian Shepherd but his father is a mystery, perhaps Staffy? We don't care what he is, he's just beautiful.
It's cold outside!
I love winter. Did I mention that once or twice in the past? I love the way it makes me feel motivated to get outside and do stuff. I love cooking in and on the wood stove, soups, stews and lovely puddings with lashings of fresh cream.
It's really freezing cold now though, temps down to zero these past few nights and some frosts. I'm trying to be frugal with the firewood, but luckily Brian keeps a steady supply for me to burn. With two fires burning around the clock, the kitchen and living room, I'm really chewing through it so we'll have a wood cutting afternoon on Sunday.
Have a lovely weekend, where-ever you may be. Ours will be a busy one as usual. There's a new fence to be built, butter to be made, a vegetable garden to be weeded, food to be cooked and shared.
Here is a funny little article, most of which I can relate to. (10 things your non farm friends don't understand) http://forfarmandranchwomen.com/2015/06/15/10-things-your-non-farm-friends-just-dont-understand/
Monday, 15 June 2015
Soda Water Scones
Yesterday was such a busy day here as is usual on most Sundays. The weekends are when we can both get lots of jobs done.
I was half expecting people to drop in for afternoon tea so I whipped up a batch of scones to be at the ready, just in case.
My scones used to be very hit and miss, usually turning out perfectly when there was just us and no one to impress, but just as soon as I was trying to make the perfect scones for guests, well.... you can guess the rest.
I found a perfect recipe that is easy and turns out impressive scones that the harshest critics could not fault. I guess Lemonade scones are no surprise to most of you, but my adaptation of them is now a winner here.
We found them a bit too sweet so I use soda water instead of the lemonade. We never have lemonade sitting around in our cupboards, never drink the stuff, but we do always have soda water on hand.
1 teaspoon castor sugar
1 cup of cream (a good opportunity to use up that cream that's getting a bit old)
pinch of salt
1 cup soda water
Mix with a knife until the mixture comes together. It may be necessary to add a small bit of milk if the mixture is too dry.
It's important not to over work scones. Just bring it all together, tip onto a lightly floured surface and press out with a "light hand" as my mum would say, to a thickness of approximately 2 cm or 1 inch.
I believe it's best not to use a rolling pin which can overwork the mixture.
Cut out with a scone cutter or a glass dipped in flour after each cut. Place close together on a baking tray, brush the tops with milk and bake in a hot oven - 200deg - for approx 15 mins or until golden brown and well risen.
Or cut with a knife & spread slightly apart on the baking tray. The latter seems to be the new trend, but who of us is trying to keep up with a trend? Handy to know though when a scone cutter is not available when staying with friends who don't cook or away on holiday in the caravan and the craving for scones is impossible to ignore.
Enjoyed for morning tea with peach jam and Daisy's fresh cream.
I packed the remaining scones, six to a bag, and put in the freezer. They reheat very well.
A few seconds in the microwave and then approximately 5 minutes in a hot oven.
Lucky me, I have the wood oven burning at all times at the ready.
I was half expecting people to drop in for afternoon tea so I whipped up a batch of scones to be at the ready, just in case.
My scones used to be very hit and miss, usually turning out perfectly when there was just us and no one to impress, but just as soon as I was trying to make the perfect scones for guests, well.... you can guess the rest.
I found a perfect recipe that is easy and turns out impressive scones that the harshest critics could not fault. I guess Lemonade scones are no surprise to most of you, but my adaptation of them is now a winner here.
We found them a bit too sweet so I use soda water instead of the lemonade. We never have lemonade sitting around in our cupboards, never drink the stuff, but we do always have soda water on hand.
Soda Water Scones
3 cups SR Flour (or plain flour with Baking Powder added)1 teaspoon castor sugar
1 cup of cream (a good opportunity to use up that cream that's getting a bit old)
pinch of salt
1 cup soda water
Mix with a knife until the mixture comes together. It may be necessary to add a small bit of milk if the mixture is too dry.
It's important not to over work scones. Just bring it all together, tip onto a lightly floured surface and press out with a "light hand" as my mum would say, to a thickness of approximately 2 cm or 1 inch.
I believe it's best not to use a rolling pin which can overwork the mixture.
Cut out with a scone cutter or a glass dipped in flour after each cut. Place close together on a baking tray, brush the tops with milk and bake in a hot oven - 200deg - for approx 15 mins or until golden brown and well risen.
Or cut with a knife & spread slightly apart on the baking tray. The latter seems to be the new trend, but who of us is trying to keep up with a trend? Handy to know though when a scone cutter is not available when staying with friends who don't cook or away on holiday in the caravan and the craving for scones is impossible to ignore.
Enjoyed for morning tea with peach jam and Daisy's fresh cream.
I packed the remaining scones, six to a bag, and put in the freezer. They reheat very well.
A few seconds in the microwave and then approximately 5 minutes in a hot oven.
Lucky me, I have the wood oven burning at all times at the ready.
Thursday, 11 June 2015
I should have plaits and wear a dirndl
Camembert with white mould beginning to appear
It's been awhile between blogs and although there is so much to write about there never seems to be the time.
I'm in my element now that Daisy is producing the loveliest milk for me to continue my passion for cheese-making. I'm learning new things with every batch and having such fun experimenting.
Too frugal to pay out for a course or workshop, I'm ever thankful for the world wide web and the information at my fingertips. I have a love of improvising and experimenting which I can afford to do by making small batches, (the chooks rarely get my failures now) and having plenty of lovely raw milk from our own cow.
I really must remember to carry my camera across to the dairy one evening so I can show you the funniest sight of all three calves suckling from Daisy. Yes, the very same Daisy who would NOT accept a foster calf.
We are still supplement feeding the two bobby calves while Daisy's calf feeds solely from her mum, but we catch sight of them frequently, all three on the udder at once.
When I need milk for the house (and for cheese) I separate the calves from Daisy in the morning. In the evening we milk Daisy but leave a little in the udder for her calf Dusty. Apparently, cows will always hold back enough milk for their calf, but I always turn off the machine before she runs dry.
We pour fresh milk from the bucket into the calf feeders for Blackie & Jordie who slurp hungrily at their 2 litres each whilst Daisy stands blissfully as Dusty has his full.
All three calves are then released to spend the night with Daisy and the other cows, no doubt catching little suckles during the night.
Well, it's never really quite that simple. We checked them daily for fly strike (maggots), grass seeds in eyes, ears and non- mentionable parts of anatomy, and had them shorn in January.
We paid $42 each for them and today sold them for $115 each!! Not bad eh?
Needless to add that no, we did not splurge on fripperies with our profits. That money will go towards the new (to us) tractor, or the hay cutting contractor, or one of many expenses that crop up during the year, including a month of holidays.
So, my mission for the following weeks is to take more photos, but there is cheese to be made so I can't promise anything.
Living the simple life requires frugality in just about everything we do, so I do believe it's time to share our little tips of frugality or "what Nanna would have done".
What do you do to save a little bit here and there?
My tip for today is to use less. Yes, just use less. Less dish detergent, less washing powder, less hand wash. The manufacturers want you to buy more so they instruct us to use a certain amount which is really double what is required to do the same job.
If you have a dish washer (I don't but I did this at my daughter's home last month) cut the detergent tablets in half. Same effect of cleaning and the packet of (expensive) dish tabs lasts twice as long.
I look forward to hearing some of your tips.
It's winter, it's cold, dress warm, put on another layer and turn the heater down.
Cheers until next time.
Sunday, 31 May 2015
The last day of May
A foggy mist across the valley this morning as I headed out to collect some firewood.
The leaves have almost finished falling from the Glory vines and Manchurian Pear trees. I love this time of year and am ever thankful that I'm not bothered by leaves. Occasionally the leaf rake gets waved around when little plants are suffocating, but there's nothing quite like kicking through a pile of leaves when walking from the house to the paddock.
I never take this place for granted. The morning view of the house always makes me feel so grateful to be here.
An abundance of lemons and limes so I whipped up a few jars of marmalade to put in the Farm-gate stall. And for spreading onto home made bread, toasted, with lashings of fresh butter. (sigh...)
The recipe I used is from "A Year on the Farm" by Sally Wise
After borrowing this book from our local library, I knew I had to have a copy in my kitchen to keep, so it's one of the very few books that I purchased in its new state.
Now it's covered in sticky notes and bookmarks so I can quickly find cheesecake recipes, marmalades, jellies, cordials, chutneys and lots of delicious preserves.
I especially like the way she makes small batches so that nothing takes a monumental effort to achieve. I remember in the early days of my married life, planning well ahead to make the yearly batch of chutney with 20lbs of fruit which took all day. The entire house, and everything in it, smelled of chutney for days after.
The Sally Wise recipes are simple and can be whipped up in little time. I wish it had been around twenty years ago.
Hardly a dent was made in the huge bowl of citrus perched on the dining table. While I ponder my next methods of using them up, the room is wonderfully fragrant.
I'll definitely make more citrus cordial for use in summer, as well as lemon butter and a lemon tart or two in the coming weeks.
The leaves have almost finished falling from the Glory vines and Manchurian Pear trees. I love this time of year and am ever thankful that I'm not bothered by leaves. Occasionally the leaf rake gets waved around when little plants are suffocating, but there's nothing quite like kicking through a pile of leaves when walking from the house to the paddock.
I never take this place for granted. The morning view of the house always makes me feel so grateful to be here.
An abundance of lemons and limes so I whipped up a few jars of marmalade to put in the Farm-gate stall. And for spreading onto home made bread, toasted, with lashings of fresh butter. (sigh...)
The recipe I used is from "A Year on the Farm" by Sally Wise
After borrowing this book from our local library, I knew I had to have a copy in my kitchen to keep, so it's one of the very few books that I purchased in its new state.
Now it's covered in sticky notes and bookmarks so I can quickly find cheesecake recipes, marmalades, jellies, cordials, chutneys and lots of delicious preserves.
I especially like the way she makes small batches so that nothing takes a monumental effort to achieve. I remember in the early days of my married life, planning well ahead to make the yearly batch of chutney with 20lbs of fruit which took all day. The entire house, and everything in it, smelled of chutney for days after.
The Sally Wise recipes are simple and can be whipped up in little time. I wish it had been around twenty years ago.
Hardly a dent was made in the huge bowl of citrus perched on the dining table. While I ponder my next methods of using them up, the room is wonderfully fragrant.
I'll definitely make more citrus cordial for use in summer, as well as lemon butter and a lemon tart or two in the coming weeks.
Saturday, 30 May 2015
Olives
It's olive season and here in the Barossa there are plenty of olive trees to pick from. I pick mine from the same secret location each year. They are big and plentiful and so easy to pickle.
In years past I tried to pickle olives but the disposal of buckets full of salt water every couple of days was a big problem. Where to tip it without it getting it into the soil, drains, and waterways?
I gave up on pickling olives.
A few years later I found another recipe that is so quick and easy. The jars last for years, we're currently eating some that I pickled in May 2011. I think they actually improve over time.
You will need;
A bucket (or 2, depending on how many olives you're going to pickle) to soak the olives in.
Some clean jars with screw top lids.
Rain water
Fresh garlic, lemon, fennel seeds, chilli or which ever flavors you want in your olives.
Salt
A big saucepan to make the brine.
Put olives into a plastic (food grade) bucket and cover with rain water. I use both green and black olives all mixed in together as this is how they come when we pick them.
Stir them around a little with your hand and leave them soak.
Change the water every day for 3 days.
On the 4th day when you're ready to put the olives into jars, make a 10% brine. (To 1 litre of boiling water add 100g of salt) Allow to cool for 5 minutes before using.
Drain the olives and put into clean glass jars, adding a couple of slices of garlic, a few fennel seeds, a piece of chilli, a thin slice of lemon, or none of these if you prefer.
Cover with the hot brine, and screw on the lids.
Write the date on the jars and store in a dark place for 6 months.
They ferment in the jars and sometimes ooze so I suggest you sit the jars in a plastic container to catch the spills.
Taste after 6 months. Sometimes they need longer. Keep in fridge after opening.
Play around with the flavours and wait to see the end result in a few months time. Then you can adjust the following year.
We have planted a few varieties of olive trees here and look forward to crops in the future. I love the trees and wouldn't really care if they give us olives or not.
Half the fun is in the searching for your olives and picking them just at the right time.
Do you pickle olives?
Do you have another recipe to share?
What things do you make from your pickled olives?
Subscribe to:
Posts (Atom)